
Model details
Viewing a model in detail
Section titled “Viewing a model in detail”Double-clicking a model opens the full detail page:
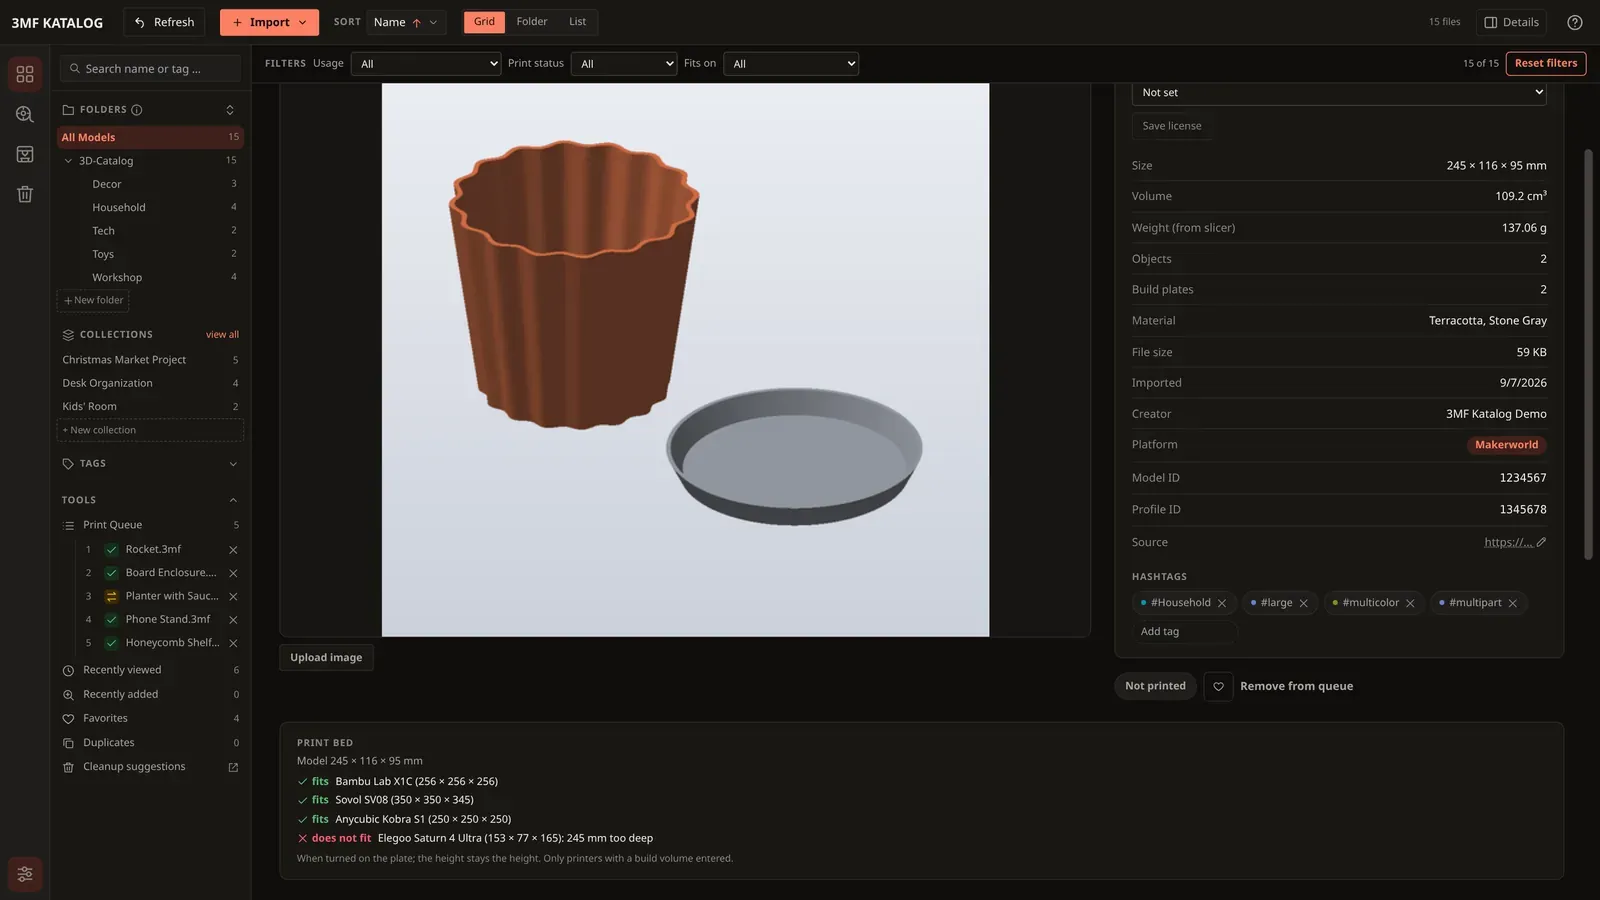
Top right in the preview area, you switch between the 3D view (free rotation by dragging with the mouse, plus auto-rotation and 15°-step buttons) and the stored image — which of the two is shown by default is set in Settings under “Preferred view”. On the right you’ll find all metadata (dimensions, volume, estimated weight, material, file size, import date, creator), followed by a source field (e.g. a link to the model’s origin page) and your hashtags, with the option to add or remove more. If the file has already been sliced in OrcaSlicer or Bambu Studio, the app reads the real filament weight straight from the slicer’s metadata instead of only roughly estimating it — including a breakdown per print plate and filament, plus an estimated material-cost total if matching spools are on record in the Material Manager. The “Rescan metadata” button re-fetches these values later on, in case you sliced an already cataloged file after the fact.
For models downloaded from MakerWorld, the metadata also names the platform, the model ID and the profile ID. The app reads them from the 3MF file; nothing is shown for files without a platform. For models already in the catalog, “Rescan metadata” fills them in.
If a 3MF file contains no slicer data, the detail page shows a “Filament usage” box with the note “No usage given.” instead of the usage. Why this happens and how to get the usage is explained under Filament usage is missing.
Colors, preview and print plates
Section titled “Colors, preview and print plates”If the file contains supported color information, switch between “File colors” and “Single color”. The “Colors in the file” legend maps colors to objects. In the small preview, use “Legend” to open or close it.
As color information, the preview shows standard 3MF materials and, for projects from Bambu Studio, OrcaSlicer and MakerWorld, the filament of each object and part as well as painted areas. A painted triangle that the slicer subdivided shows the color that covers most of it; the legend says so (“Painting simplified: each triangle shows its main color.”). If a file contains colors the preview cannot show, the 3D view shows a short note (“Not all color information in this file can be shown.”) instead of silently staying single-colored.
STEP files are displayed with a 3D preview. STEP preview is always included in the single download per system (see Installation).
Viewing print plates one by one
Section titled “Viewing print plates one by one”If a 3MF file contains several print plates, a bar appears below the model in the 3D view with All, an arrow to the left, the plate numbers and an arrow to the right:
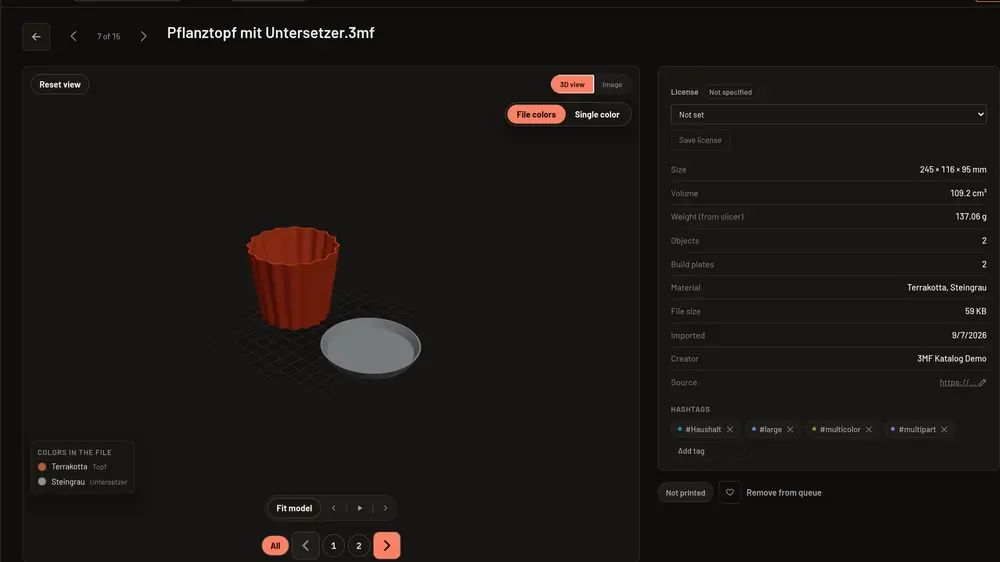
- All shows every object in the file, a number only the objects of that plate. A tooltip on the number gives the plate’s name if the file defines one.
- The arrows step through the plates one by one. At the first and the last plate the arrow is grey and does nothing. From “All”, the right arrow leads to the first plate.
- When the bar has focus you can also step with the left and right arrow keys.
- With more than 12 plates the bar shows the position instead of the numbers, for example “3 / 14”, and the plate’s name.
The bar is available in the 3D view of the detail page and in the details panel, not in the image view. A file with only one plate has no bar.
When the 3D preview does not appear
Section titled “When the 3D preview does not appear”If the 3D preview cannot be shown, a card in the preview area explains why instead of leaving it empty. The stored image stays visible behind it, if there is one.
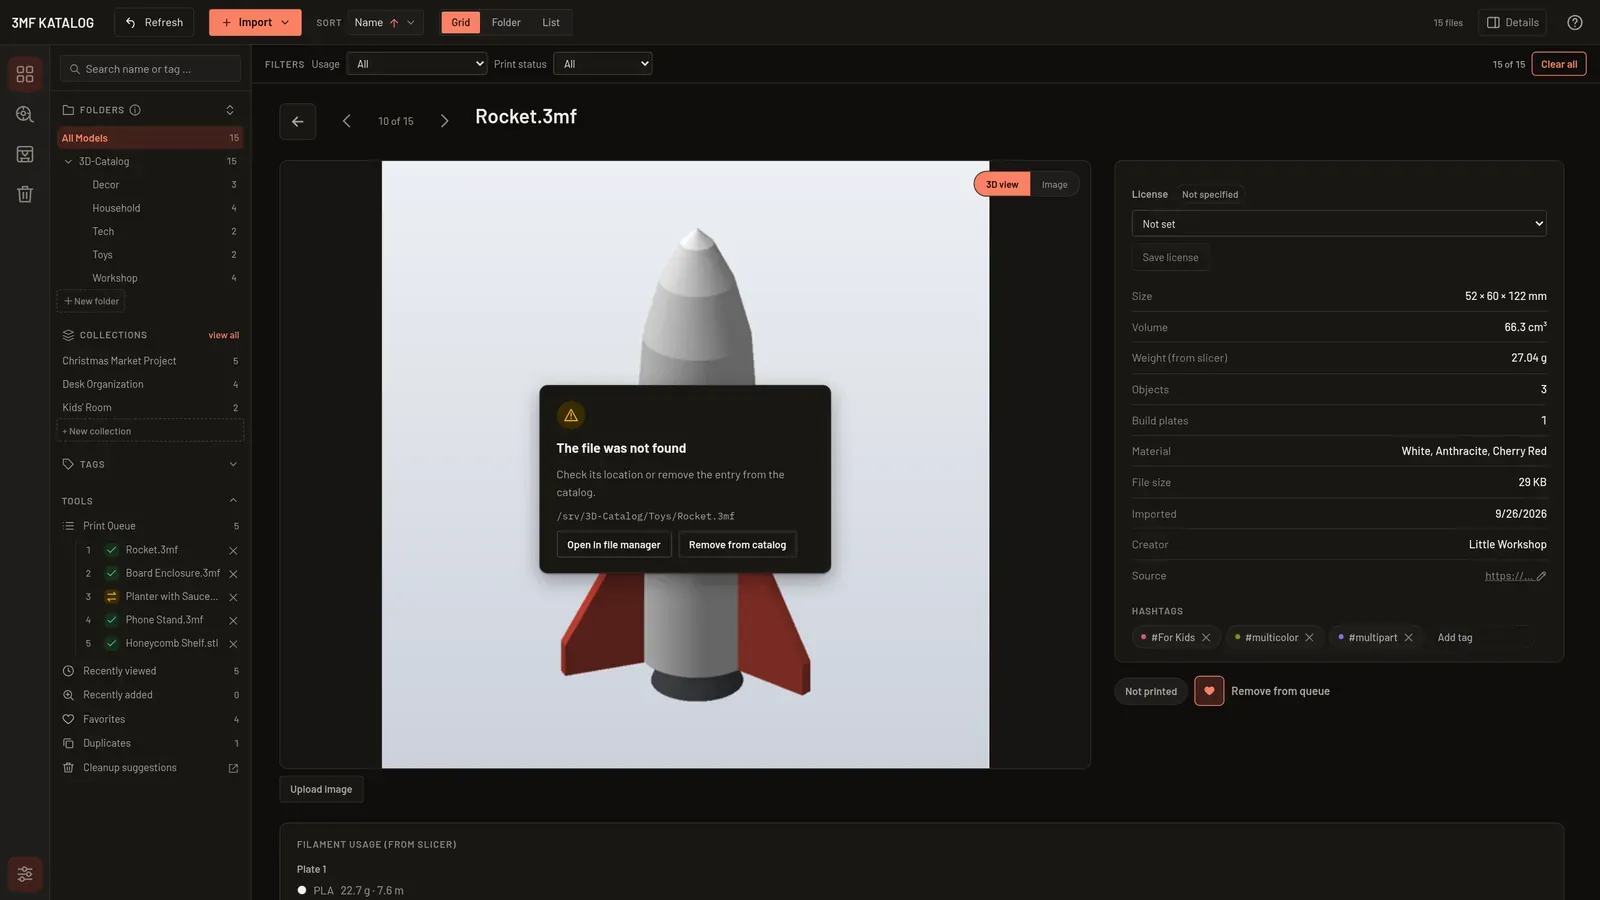
- “The file was not found”: check its location or remove the entry from the catalog. The card shows the path and offers “Open in file manager” and “Remove from catalog”.
- “The file cannot be read”: it is damaged, locked or has no displayable geometry. Check whether another program has it open. The card offers “Open in slicer”.
- “The model is too large for the 3D view”: it exceeds the app’s limits (more than 3 million triangles, repeated objects count individually, see Known limitations). Use the preview image or open it in your slicer.
- “The 3D view is not supported on this computer”: WebGL is unavailable. Use the preview image or open the file in your slicer.
- A file type without a 3D preview shows “This file type has no 3D preview”. For unexpected errors, the card also offers “Report problem”.
Does it fit the print bed?
Section titled “Does it fit the print bed?”For every printer in the Printer Manager that has a build volume entered, the detail page and the details panel show under “Print bed” whether the model fits. The “Model” line gives the size of the model. Each printer is marked “fits” or “does not fit”; if a model does not fit, the app names the excess, for example “12 mm too wide”, “too deep” or “too tall”. If the size of the model is not known, it says “size unknown”.
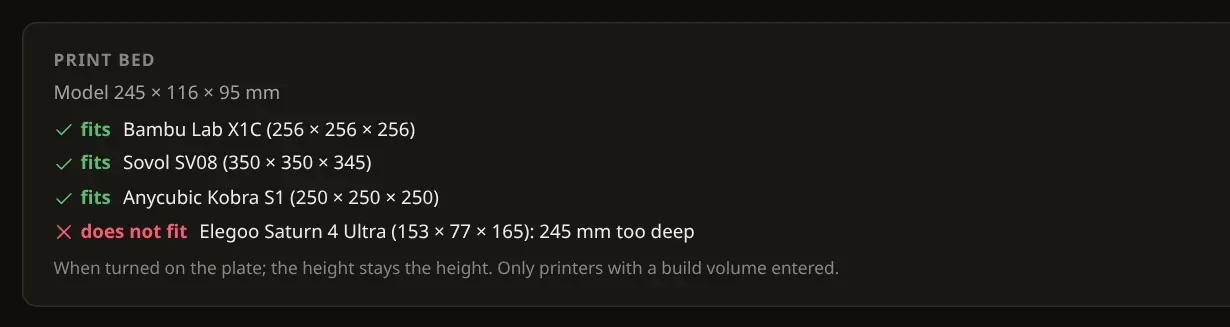
The check allows the model to be turned on the plate, so width and depth may swap; the height stays the height. Printers without a build volume are not listed.
The “Fits on” filter in the filter bar shows only models that fit the chosen printer. It appears once at least one printer has a build volume. Models without a known size stay visible.

Companion files
Section titled “Companion files”Under “Companion files” in the details panel and on the detail page, you attach pictures, PDFs and text files to a model, for example assembly instructions or print notes.

- Add: “Add …” opens a file dialog. When you import an archive, companion files in it are assigned to their model automatically.
- Show and open: pictures appear as thumbnails; a click shows an enlarged view. PDF and text files open with your default program via “Open”. Each entry also has a menu (“More actions for …”) with “Show in file manager” and “Remove”. A file that was deleted outside the app is marked “File missing”.
- Where they live: companion files are stored in a folder
Name_extrasnext to the model file and go to the trash together with the model. - Removed by mistake: a removed companion file stays in the app trash for 7 days. Restore it with “Restore” from the notice or from the model’s “Removed (N)” list.
- Docker: inside the container, “Open” cannot start a program. The app says so and asks you to open the file on the Docker host.
Moving between models
Section titled “Moving between models”“Previous model” and “Next model” follow the current model order. A position indicator shows where you are. Left/right arrow keys also switch models while you are not editing an input. If you have unfinished input, switching with the buttons asks you to “Keep editing” or “Discard and switch”.
“Show in file manager” opens the file’s location. On Windows the action is called “Show in Explorer”, on macOS “Show in Finder”. It is also available in the detail panel and the model card’s context menu. On Linux, selecting the file depends on the file manager.
When you add tags, the app suggests existing tags. A colored dot shows the tag color on the detail page and in the detail panel too.
In the “License” section you record how you may use the model (License and usage).
At the bottom left you can mark the model as printed and add it to the queue. The heart marks it as a favorite; you find all favorites under “Tools → Favorites”.